

In today's fast-paced digital world, having a dual monitor setup can significantly boost your productivity and enhance your overall computing experience. However, managing multiple monitors can sometimes be a bit tricky, especially when it comes to swapping their positions or changing their numbering. In this comprehensive guide, we'll walk you through the process of easily swapping Monitor 1 and 2 on your Windows computer, ensuring a seamless and efficient multi-monitor setup.
Understanding Monitor Numbering and Its Importance
Before we dive into the steps to swap monitors, let's first understand what monitor numbering is and why it matters. Monitor numbering is a crucial aspect of Windows display settings, particularly in a dual or multi-monitor setup. This feature allows users to identify and manage multiple monitors connected to their system efficiently.
The significance of monitor numbering lies in its ability to enhance the user experience by providing a clear and organized way to configure and utilize multiple displays. In a dual or multi-monitor setup, monitor numbering plays a vital role in several ways:
-
Easy Identification: By assigning a unique number to each monitor, users can easily identify and distinguish between different displays. This is particularly useful when dealing with multiple monitors of the same model or size, as it helps avoid confusion.
-
Customizable Settings: Monitor numbering enables users to configure specific settings for each display. For instance, users can set different resolutions, orientations, or refresh rates for each monitor, allowing for a tailored experience.
-
Efficient Window Management: With numbered monitors, users can effortlessly move windows and applications between displays. This feature is especially useful for multitasking, as it enables users to organize their workspace more effectively.
-
Improved Productivity: By providing a clear and organized way to manage multiple monitors, monitor numbering significantly enhances productivity. Users can focus on their tasks without worrying about which monitor is which, leading to increased efficiency and accuracy.
Accessing Display Settings in Windows 10 and 11
To swiftly access the display settings menu in the latest Windows operating systems, such as Windows 10 and 11, there are several methods you can utilize. Here are the detailed steps, including keyboard shortcuts where available:
Method 1: Using the Windows Key + P
-
Press the Windows Key + P: This is the most straightforward method. Simply press the Windows key on your keyboard, which is typically located between the Ctrl and Alt keys, and the "P" key simultaneously. This will immediately open the Projector window, which allows you to quickly access and modify display settings.

Method 2: Using the Notification Area
-
Click on the Notification Area: In the bottom right corner of your screen, you will find the Notification Area, often represented by a small speech bubble icon. Click on this icon to open the Notification Panel.

- Click on the Display Option: Within the Notification Panel, you will see a list of available options. Click on the "Display" option to open the Display Settings window.
Method 3: Using the Start Menu
- Open the Start Menu: Click on the Start button, typically located at the bottom left corner of your screen. This will open the Start Menu.
-
Type "Display Settings": In the search bar at the top of the Start Menu, type "Display Settings" and press Enter. This will directly open the Display Settings window.

Method 4: Using the Windows Key + I
-
Press the Windows Key + I: This keyboard shortcut will open the Settings app. Once opened, navigate to the "System" section.

- Click on Display: Within the System section, click on the "Display" option on the left side of the window. This will open the Display Settings window.
Method 5: Using the Right-Click on the Desktop
- Right-Click on the Desktop: Right-click anywhere on your desktop to open the context menu.
-
Select "Display Settings": In the context menu, select the "Display Settings" option to open the Display Settings window.

By following these methods, you can quickly and efficiently access the display settings menu in Windows 10 and 11, allowing you to make any necessary adjustments to your display preferences.
Identifying and Rearranging Monitors
Once you have accessed the Display Settings window, the next step is to visually identify and rearrange your monitors. Here's a detailed guide on how to do it:
Step 1: Identifying Monitors
In the Display Settings window, you will see a visual representation of all the connected monitors. Each monitor is identified by a number, usually starting from 1. This number is crucial in identifying which monitor is which. Take note of the number assigned to each monitor, as this will help you in the rearrangement process.

Step 2: Understanding the Drag-and-Drop Feature
The drag-and-drop feature is a straightforward tool that allows you to rearrange the order of your monitors. To use this feature, simply click and hold on the monitor you want to move, then drag it to the desired position. You can move monitors up or down, left or right, depending on how you want them to be arranged. As you move a monitor, you will see a gray outline indicating its new position. Release the mouse button to confirm the new position.
Step 3: Rearranging Monitors
Using the drag-and-drop feature, start rearranging your monitors in the desired order. For example, if you want Monitor 2 to be on the left and Monitor 1 to be on the right, simply drag Monitor 2 to the left of Monitor 1. You can continue rearranging the monitors until you achieve the desired configuration.
Step 4: Saving Changes
Once you have rearranged the monitors to your liking, click on the "Apply" or "OK" button to save the changes. Your monitors will now be rearranged according to your preferences. If you are not satisfied with the new arrangement, you can always go back to the Display Settings and make further adjustments.
Setting the Primary Monitor
After rearranging your monitors, you may want to set one of them as the primary display. The primary monitor is the one that displays the taskbar, Start menu, and other system icons. Here's how to set the primary monitor:
Step 1: Access Display Settings
Follow the steps mentioned earlier to access the Display Settings window.
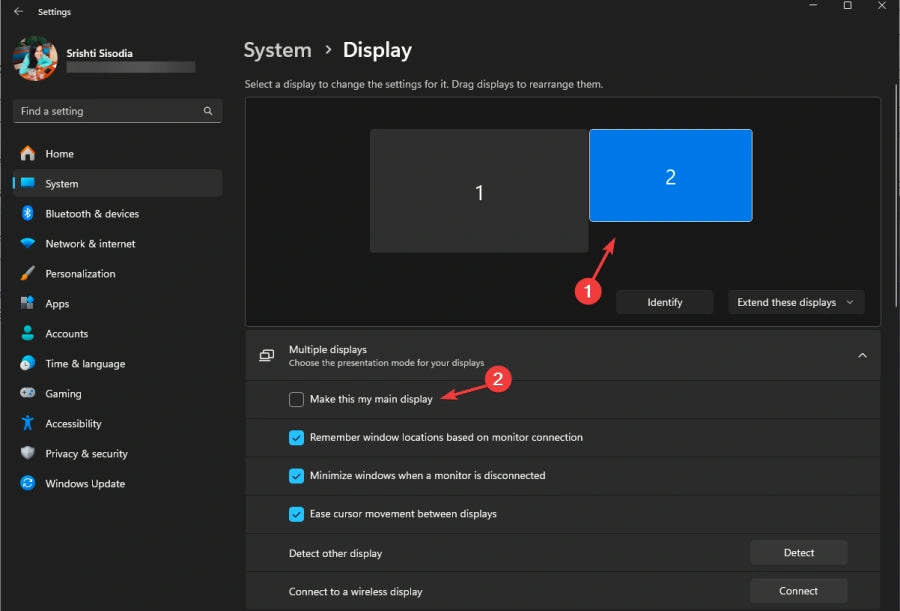
Step 2: Identify and Select the Primary Monitor
In the Display Settings window, you will see a representation of your monitors. Click on the monitor you want to set as the primary display. Check the box labeled "Make this my main display" or "Set as primary" to designate it as the primary monitor.
Step 3: Save Display Order Changes
After setting the primary monitor, you can adjust the order of your monitors by clicking and dragging them to the desired positions. Click "Apply" to save the changes. If the changes do not persist, try restarting your system or updating your graphics drivers.
Troubleshooting Common Issues
Despite following the steps mentioned above, you may encounter some issues while swapping monitors or setting the primary display. Here are some common problems and their solutions:
Monitor Numbers Not Changing
If the monitor numbers are not updating correctly, it could be due to incorrect BIOS settings, hardware malfunctions, or software conflicts. To resolve this issue, try the following:
- Check BIOS Settings: Ensure that the BIOS settings are configured correctly to reflect the actual monitor setup.
- Verify Hardware Connections: Check that all cables are securely connected and that the graphics card is functioning correctly.
- Update Graphics Card Drivers: Update graphics card drivers to ensure compatibility with the monitor setup.
Display Settings Not Persisting
If your display settings are not being saved or are reverting back to the previous configuration after a restart, try these solutions:
- Save Your Settings: Make sure to save your monitor settings before shutting down your computer. This can usually be done through the Display Settings or the monitor's on-screen menu.
- Use a Persistent Configuration File: Some operating systems allow you to save your display settings to a configuration file, which can be loaded automatically on startup.
- Adjust BIOS Settings: Check your BIOS settings to ensure that the display settings are being saved and that the monitors are properly detected.
Software Conflicts
Sometimes, software conflicts can cause issues with monitor numbering or display settings. To resolve this, follow these steps:
- Identify Software Conflicts: Check if you have multiple display management software installed, as they may conflict with each other.
- Uninstall or Configure Software: Either uninstall the conflicting software or configure them to work together seamlessly.
- Update Operating System and Display Drivers: Ensure that your operating system and display drivers are up to date to minimize software conflicts.
Tips for Optimal Dual Monitor Setup
To make the most out of your dual monitor setup, consider the following tips:
Optimize Display Resolution
Set both monitors to the appropriate resolution based on your needs and preferences. For general productivity, a resolution of 1920x1080 (Full HD) or 2560x1440 (Quad HD) is suitable. For graphics or video editing, consider higher resolutions like 4K (3840x2160) or 5K (5120x2880).
Manage Desktop Shortcuts
Utilize shortcuts to efficiently switch between monitors, move windows, and resize them. For example, use the Windows key + Left/Right arrow to move a window to the left or right monitor, and the Windows key + Up/Down arrow to maximize or restore a window.
Customize Display Preferences
Adjust display settings to suit your needs, such as setting different wallpapers for each monitor, adjusting brightness and contrast, and configuring the orientation of each monitor. Experiment with different configurations to find what works best for you.
Use Dual Monitor Software
Leverage software tools like UltraMon or DisplayFusion to manage your monitors, set up custom shortcuts, and enhance your overall productivity. These tools can also help you split your monitors into multiple virtual desktops, making it easier to manage multiple applications and tasks.
Conclusion
Swapping Monitor 1 and 2 on your Windows computer is a straightforward process that can greatly enhance your productivity and overall computing experience. By understanding monitor numbering, accessing display settings, and using the drag-and-drop feature, you can easily rearrange your monitors to suit your preferences.
Remember to set the primary monitor, troubleshoot common issues, and optimize your dual monitor setup for the best results. Don't hesitate to experiment with different configurations and utilize software tools to further enhance your multi-monitor experience.
We hope this comprehensive guide has provided you with the knowledge and steps necessary to easily swap Monitor 1 and 2 on your Windows computer. If you found this article helpful, please share it with others who may benefit from it. Feel free to leave a comment below with your own tips, experiences, or any questions you may have regarding multi-monitor setups.